Gallery

June 23, 2009

It feels like fall in New England....

......where I'm finishing some work.....

....making something for a friend......

.... using some scrap wire...

........and remembering.
When I was 5 or 6 and Mrs. Grab used to babysit. She had this fabulous pocketbook; always stuffed with wrapped hard candies and soft caramels. There was this minty blue candy with a soft, chewy center, looked just like the blue bead, above.
Posted by Picasa

June 18, 2009

A good day.....


......Is when (or so I hope) the last white thread tail is tied off the Guild's raffle Q.

Another sneak peak below. Once it's returned to the committee and the binding and sleeve are attached, a full picture will be posted. If you are interested in buying a ticket, I can direct you how to take a chance, when the info is made available.


Guild members (not me) pieced the blocks and a talented crew of women hand appliqued the panels and assembled the top. Precision is the name of their game.

The quilting shows better on the back, which was my intent. The top is so lovely that detailed quilt work would distract from the piecing precision. The back becomes a whole cloth with the light blue backing fabric. Two quilts for the price of a buck/ ticket.....


And to top off yesterday's good day.... a purchase arrived. These hand dyes were purchased from Vicki's Etsy shop. They are gorgeous. The photo does not show the true color, but they are vibrant and wonderful and came packaged so professionally.


Posted by Picasa

June 17, 2009

Simple Crayon Keeper

I have seen these little crayon keepers for awhile cruising the web or in sewing publications. I didn't use any one set of directions, but just kind of measured and cut as I thought it would be a good size. I put a thin layer of batting on the inside, fused it down and stitched the layers together - pillow case style. The crayons are held in place with a long strip of felt after seams were sewn vertically. The slots can hold either one or two crayons neatly.

I recall the keepers I've seen had a ribbon tie to wrap around and house the roll tidy. I'm sending this to Jack and I don't know for sure, but don't think his little fingers can tie yet. A button and elastic closure was used and after a few tries, I bet he will be able to take care of his colors independently.

Today- summer vacation officially starts. Last night; one artistic child mentioned he would like to go places and draw pictures of what he sees. How can I argue with that request? But first, he will be making his own art pencil keeper, he will be able to take care of his supplies - independently. By goochying the measurements slightly and choosing his own fabric, this will make a very smart pencil keeper.

Posted by Picasa

June 15, 2009

Laundry Day Quilting


Having seen the use of dryer sheets here, I started to wonder about the possibility of using them for the butterfly piece (aka blue project). Going through the stash of stabilizers, a piece of heavy wt., cut away was fused to the dryer sheet. Teflon sheets were used or the dryer sheet quickly melted. Mixing Aloe gel and a textile paint, the pieces were painted and left to dry on a rack, then heat set.


Once dry, petals were cut and flowers were tacked down using a drop of Aqua Glue. Detail work will be added when the stems are satin edged. A tear away stabilizer will be used on the back.

Normally, the stems would be satin edged first and then the flowers added. But, because time is of a premium these days, the entire piece will be satin edged as a unit. I'm not sure how the flowers will hold up, but it was fun to play around with dryer sheets and add a little dimension to the piece.


June 11, 2009

The Guild Raffle Q


The Guild's raffle q has been on and off the frame for awhile. Currently it is on, still with many tie offs to go. Now, I'm stitching around the centers of the flowers below. Each of the circle flowers was reverse applique, so I'm driving around the the center swirl adding dimension to an otherwise unquilted large circle.


Posted by Picasa

June 6, 2009

Charms and Quilting Marked Lines


More colorful charms to add to the bracelet. I'll hitch them on later today, while watching kids baseball. Yeah, we are the dorks who sit on the side... He doing his word puzzles and me fidgeting with something or another, today it will be charms. Multitasking is a good thing, you know.


A search found the charm article I was thinking about- Jan/Feb 2009 issue#22 of Cloth Paper Scissors. It included adorably, crafted charms with directions on how to make polymer clay charms. This review of the article is quite timely as the kids will be out of school next week, and I know one in particular who will be rummaging for something crafty to do.


Below is the quilt I marked with that slick pencil I posted about the other day. JZ wanted a Shashiko look in the black strips, so I'm having some fun putting in the different designs and shapes.


A few cranes were requested, the threads are not tied off, but you can get the general idea.


The pencil will wipe away nicely where school chalk (which I also love to use) would leave a little thicker line and take more rubbing effort to remove.


Posted by Picasa

June 5, 2009

A Charming Pastime

This is something I've seen along the way in several magazines and online. I think Cloth Paper Scissors had a swap or a contest. It was awhile ago, and like most stuff... by the time I get around to it, it's old news. Anyway, I've had the chain bracelet waiting for the charms. I started to make them and found they were very quick and easy to make. Addicting.


All the beads and crystals were from my stash. Just about every link has a charm now, each link will end up getting two. The next round should be more colorful, I think


Linked buttons..... I stopped, because the jump rings I have are not strong enough and I think they could pull apart, easily. Once the correct gauge rings are acquired, I'd like to connect the buttons, and maybe add charms or even the shanked buttons.


And so, all that charming stuff occurred in between marking off a quilt - which can start to feel tedious. But, I used this slick marking pencil and found that I love it. I've used it before to mark a vine or lines, but this time I used it to mark off some finer details. It works like a charm, it's a mechanical pencil with white lead. Isn't it fabulous when something works like we want it to when we need it to?

Posted by Picasa

June 4, 2009

Using Fusibles

Deb Geyer a blogger of Quilt Studio is hostessing a Fusible discussion; she is requesting bloggers who have used fusible to post about their experiences. You can find info here. As of now, it doesn't look like there are many postings, so go ahead- post about your experiences and link back to the site.

The above picture is a Christmas quilt (a MKenna Ryan design), I posted a picture of the entire quilt in 12/08. I used fusible web and it was before I knew anything about fusible. I layered each piece one on top of the other and fused all the pieces together. The quilt is thick and holds creases when it is stored. Quilting through multiple layers of fusible was hard, there are skips and knots on the back. The good thing- in many areas I did not have to use a stabilizer to satin stitch around the shapes as the fusible was so thick there was no way the fabric was going to get sucked into the machine.


With this quilt, I used Steam a Seam lite. It had a lighter hand and the layers were not too thick. I still used the entire fusible to cover the shape. The shapes were blanket stitched and I don't remember the needle or thread sticking and giving me trouble. The thing I do remember with the Steam a Seam is - I had trouble getting the sticky stuff to stay on the right side of the release paper. The type I used had two release papers with the sticky stuff in the middle, the stuff never seemed to stay on the side I traced the shape.
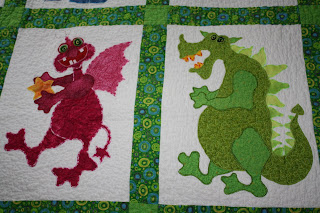
The above quilt is a Monster Quilt using a pattern from Quakertown quilts. With this quilt I used a Heat and Bond, like the Christmas quilt, but at this point I knew I didn't want the quilt to be stiff like a board, it was for my son to use. So here, I traced out the shapes and cut the interior of the fusible away, there was just about 1/4" of fusible around the shape, then I pressed that to the reverse side of the fabric. Once the shapes were cut and assembled, I satin edge stitched around. I think this is a good testimonial to this type of fusing and it's longevity through washings. This is a well loved quilt and it's standing up to time. Some of the threads from the satin edge are loose, but that is operator error with the satin edge, not fusible issues.

Funny how I thought I had invented a new technique, when working on this quilt I was asked if it was ______'s (forgot her name) technique. Apparently, there is a book out on the above method. If you are interested, a good search on fusible applique will probably find better,detailed instructions than I have given here. But this technique worked for me. On this quilt, each shape was fused using the above method. I satin edge stitched around each edge, I used stabilizer on all shapes and needled the threads to the back and knotted off. I did determine the shapes that were behind one another and satin edged them moving from bottom to top. Does that make sense? Also, I tried to satin edge as many shapes with similar color as I could. There were 100's of colors and threads, and this saved time with continually changing threads.

My Fusible of choice now is Misty Fuse. I had read about it several times. Hearing rave reviews I tried it and I'm really impressed. I like to use it with Parchment paper as opposed to the Teflon pressing sheet. I save my pieces of parchment and am able to reuse them, so it's really not as wasteful as you might think. The Misty Fuse has a nice hand and can tolerate hot pressings without loosing it's stick. I also like that I'm able to work from the front as opposed to reversing a pattern.

I'm using the Misty Fuse on a piece I'm currently working on. I will post when finished. It is so light, it's often hard to tell which side of the fabric it has been applied to.

I love hand applique, but fusibles have certainly found a place in my sewing room. (or should I say fusible room?) I'm not a purist with either method, however, it does seem to be about time management these days...... If I can use a fusible to accomplish a task, I will. The biggest problem I have is the dirty, sticky, gross iron. Using a Teflon iron helps, but cleaning a regular iron that has been used with fusibles is a nightmare.

Now, if you've made to the end of this looooooong story, thanks for reading and happy fusing.

:)
Posted by Picasa