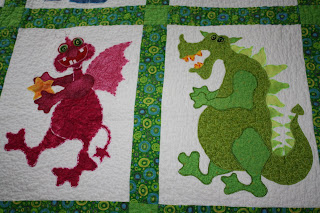
The above picture is a Christmas quilt (a MKenna Ryan design), I posted a picture of the entire quilt in 12/08. I used fusible web and it was before I knew anything about fusible. I layered each piece one on top of the other and fused all the pieces together. The quilt is thick and holds creases when it is stored. Quilting through multiple layers of fusible was hard, there are skips and knots on the back. The good thing- in many areas I did not have to use a stabilizer to satin stitch around the shapes as the fusible was so thick there was no way the fabric was going to get sucked into the machine.
The above quilt is a Monster Quilt using a pattern from Quakertown quilts. With this quilt I used a Heat and Bond, like the Christmas quilt, but at this point I knew I didn't want the quilt to be stiff like a board, it was for my son to use. So here, I traced out the shapes and cut the interior of the fusible away, there was just about 1/4" of fusible around the shape, then I pressed that to the reverse side of the fabric. Once the shapes were cut and assembled, I satin edge stitched around. I think this is a good testimonial to this type of fusing and it's longevity through washings. This is a well loved quilt and it's standing up to time. Some of the threads from the satin edge are loose, but that is operator error with the satin edge, not fusible issues.
Funny how I thought I had invented a new technique, when working on this quilt I was asked if it was ______'s (forgot her name) technique. Apparently, there is a book out on the above method. If you are interested, a good search on fusible applique will probably find better,detailed instructions than I have given here. But this technique worked for me. On this quilt, each shape was fused using the above method. I satin edge stitched around each edge, I used stabilizer on all shapes and needled the threads to the back and knotted off. I did determine the shapes that were behind one another and satin edged them moving from bottom to top. Does that make sense? Also, I tried to satin edge as many shapes with similar color as I could. There were 100's of colors and threads, and this saved time with continually changing threads.
My Fusible of choice now is Misty Fuse. I had read about it several times. Hearing rave reviews I tried it and I'm really impressed. I like to use it with Parchment paper as opposed to the Teflon pressing sheet. I save my pieces of parchment and am able to reuse them, so it's really not as wasteful as you might think. The Misty Fuse has a nice hand and can tolerate hot pressings without loosing it's stick. I also like that I'm able to work from the front as opposed to reversing a pattern.
I'm using the Misty Fuse on a piece I'm currently working on. I will post when finished. It is so light, it's often hard to tell which side of the fabric it has been applied to.
I love hand applique, but fusibles have certainly found a place in my sewing room. (or should I say fusible room?) I'm not a purist with either method, however, it does seem to be about time management these days...... If I can use a fusible to accomplish a task, I will. The biggest problem I have is the dirty, sticky, gross iron. Using a Teflon iron helps, but cleaning a regular iron that has been used with fusibles is a nightmare.
Now, if you've made to the end of this looooooong story, thanks for reading and happy fusing.


4 comments:
I'm a Wonder Under gal. No one sells it around here, so I did mail order. I just bought a 35 yard bolt of it, if that's any testimony. It's so light, handles the heat, and won't gum up your needle when quilting. Many people swear by Steam a seam 2, but I won't use it again. It's too stiff if you want to heavily quilt the area you used it. I like the Heat n Bond, but have a lot of lifting around edges when I use it. I do a lot of applique, some of them very big, and don't want a lot of fussing over my fusing.
I like the Misty Fuse, too for certain limited projects. It's great for the foils, and art quilt applications.
These quilts you posted to demonstrate your fusible experience are gorgeous. I especially liked the one with the jacobean looking flowers. Beautiful.
Interesting how everyone has their own ideas about this topic. I don't like Misty Fuse, maybe because I haven't used it much. The directions were annoyingly vague. It did work well when I fused net though. Your problem with Steam a Seam is exactly the one I found with it. Maybe I need to try Heat N Bond.
It's good to know that only using fusible on the edge of your design holds up so well. Thanks for sharing your experience.
You obviously have a lot of experience with fusibles. Thanks for sharing. All of your quilts are awesome! You do good work!
Post a Comment