Gallery

August 31, 2009

doing something with the doodles...

After reading how Kay transferred some of her photo images onto fabric, using label paper as the backing stabilizer - I had to try it with one of my CPP doodles. It worked perfectly, so much so, I had to show the fabric wrinkled, or you might think it was a paper copy. Check out her directions here.
~~~~~~~~~
After making the copy, I added paint and above you see it drying out on a paper towel. I heat set with my iron when it was dry to the touch.
~~~~~~~~~

When it was drying, I thought about what I would do with my now painted fabric doodle. If I had no plans for it, it would become another UFO pitched into the scrap pile; a habit I'm trying to break..... My first thought was to do one of those self-challenges where you make a quiltlet a week for a year. I quickly put that out of my head when I realized after the first two weeks it would become a chore and no longer be fun or even creative. But, I did decide I would make each doodle into a 12 x 12 quiltlet. The only rules are that- there are no rules.....
other than:

*it has to be 12x12 approximately*
*it has to have 3 layers (at least)*
*it has to use only recycled or collected/found goods from the house, and sewing stash*
(meaning I will not go out and buy specifically for this project)
*eventually I will bind them together into a fabric book*


So, above, you see the diamond piece, remember I worked on it last year? I didn't like how it was progressing, it went into the scrap bin. I pulled it out and cut into the background (saving the center wreath for another project) for my first quiltlet. You can see the operation in progress, below.

The flowers are left overs from another project, the ribbon is silk I dyed last fall, the keys and buttons are from the collection of stuff...


The quiltlets are going to go together as they do. No looking ahead, no looking back.
This is going to be fun.

August 29, 2009

more prompt catching up~~~

~Air~

~~~~~~~~~~~~~~~~~~

~Crave~

~~~~~~~~~~~~~~~~~~~~~~~~~~~~~

~Bold~

I didn't immediately think of anything to doodle for bold. Having gone back to it a few times, still nothing......


After buying a new set of pens, I noticed the pen's tips were labeled: S, F, M and one with a B. Oh- B for bold - I quickly doodled out a bold lined design..... Duh- B meant brush. Oh well, I kept my bold lined design for BOLD anyway.


~~~~~~~~~~~~~~~~~~~~~~~

~Blue~


August 27, 2009

It's a wrap....

.....for my pencils and markers.


Inside is a zippered pocket for the eraser, compass ruler, leads, etc. Initially the pens were held in with an elastic strap, but when the pens were inserted the elastic pulled in, gathering the edges. A pocket with individual channels worked better. The flap was added to keep the pens from sliding out.


Adding a ribbon tie on the finished side----

Posted by Picasa
.....allows me to close the wrap towards either end showing another design.
This was on my summer to do bucket list. I loved designing and making this.

August 25, 2009

Summer's lease...

...hath all too short a date. ~William Shakespeare


~~~ I love this time. Taking in the last bits of summer. Making the most of
-the getting shorter days.

~hanging out~

~staying cool~

~starting new projects~

~it's a wrap for my pencils/markers and beading seemed right- as I enjoy the last bits of summer.~


August 24, 2009

Painted fabric cell phone purse.....

.....made from using the painted and quilted fabric shown here and JZ's pattern here.
JZ's directions fit over an I phone perfectly, Enlarging slightly and adding a long strap, my purse measures approximately 5 X 6" finished. It will hold a phone and a pair of glasses.

I used an elastic pony tail holder stitched into the seam to use as a button closure. The button is one of my clear, glass, vintage buttons.
I didn't paint the back; just practiced quilted some fabric and cut to size.


***The paints I used and mentioned in the painted fabric post are Stewart Gill paints. OOOPS - not wearing my glasses when painting or posting..... I called them Stewart Gile. ***

August 23, 2009

firsts and lasts

So Guild night was this past Thursday. Usually in August we have a Chinese Auction. Members would donate gently used sewing items they didn't want/need anymore and raffle tickets were sold for something like 25 cents/ ticket - Money raised went into Programs. Over the past few years this became like a flea market-junk fest......this year (not sadly) we didn't do it.

Our program was First quilt/ Last quilt and Committee Chairs were asked to bring quilts. It was interesting. Lots of tying and big puffy quilts with fat bindings. It was fun to see how members have developed different styles over the years. The evolution and talent is remarkable.

My first quilts are long gone. Log cabins made in college, pillow cased and tied with yarn and the other quilted with a waxed twine, or maybe it was jute. At the time, I thought I hand quilted it.... but later learned- sewing something together using 2" long stitches was really basting.
Anyway.

I humbly brought my first machine quilted piece. It wasn't hard to find - it still hangs on the back of our bedroom chair. And honestly, I'm as prideful of my first machine quilting job as I am of my last. Everyone has a start.

The front is made of upholstery fabrics and lace doilies. I saw it on Simply Quilts and was determined to match that chair and ottoman I was recovering..... Having never machine quilted and not knowing what a walking or darning foot was, I removed the foot all together and 'free motion' quilted. I straight lined some of the ditches, stippled and I was even ambitious enough to draw out a cable. It's lovely, using grey thread on the back and clear on the front (I left {all of} the thread tails dangling). The clear thread on the front is similar to what fisherman use in their rods to catch fish. I'm sure I took it from the garage shelf knowing it had to be the same stuff. Clear is clear. And upon closer examination it is not completely quilted, but my friends noted the innovative binding job that was completely machine done. They wondered if I planned the arcs and waves.

I was never compelled to go back and fix my first quilting job. It's my first, it shows my development, my evolution. I will always keep it.

Thankfully, my friend Sharon helped me buy my first Bernina and taught me how to machine quilt and bind the right way.


I've been thinking a lot about firsts and lasts recently.

What was your first quilt?

August 22, 2009

--creatvie prompt catch up---

~beacon and light~
~~~~~~~~~~~
~spring~
~~~~~~~~~~~
~excitement~
If you want to play along, go to artquiltmaker and see her list of weekly prompts. I do hope you'll try and post your doodles!

August 20, 2009

for the moment...

... the current obsession is stitched and painted Jacobean flowers...

This is small and will eventually be a cell phone bag. JZ has a direction page posted on her blog, here.

I added color with the Stewart Giles paints. I wanted to see how they showed on a different colored fabric.
~~~~~~~~~~~~~~~


This block will eventually become a larger bag. The background is a moda, and the other fabrics are Vicki's hand dyes. This experiment was to see how the colors showed on moda compared to the original Fairy Frost. I imagine the results of the black moda would be similar to a black hand dye, which I had in mind.


The pink piece and this, were quilted first- then painted. There is more paint that needs to be added to the black flower, but you get the general idea of the look. I learned that I like to paint first, then quilt.


~~~~~~~~~~~~~~

And this is how the colors look on black Kona cotton. They paint up differently than they look in the jar, this will be a good key if I really start to get picky on color selection. I plan on getting more of these paints, I love them.


August 18, 2009

Jacobean Finish....

This little wall hanging was a delight to make. It is my own design and was drawn out freehand using my white chalk pencil. The paints were filled in coloring book style.


The paints used were Stewart Giles Textile Paints, both the Alchemy and Byzantia Jewel-Bright. They are metallic, one being slightly more shiny and opaque. I will do a sample swatch and list the colors as they look on black fabric, for future. But for this piece, I mixed them up and it didn't seem to matter to me.


A few colors were combined and that seemed to work fine. I used a 40wt, Signature black cotton thread for quilting. And while I love the look of crystals in real life, they are very distracting in photos.

August 17, 2009

the quilting...


I really enjoyed using these paints and loved how they looked on the Fairy Frost fabric. I started to quilt the piece using black thread.
I'm thinking; next, I'd like to try the paints on a piece of hand-dyed black fabric that has that sueded, softened look.


August 15, 2009

thank you..

...madame deer, for doing the weeding. i've been busy with my quilt work...

..... and playing with my new paints.


August 14, 2009

Another finish and more houses~


This is the last of the three- ink, chalk, paint, pencil and thread experimental pieces. I was going to use threadwork to color in the blackened area, but because of my discovery, I don't really like doing all that threadwork; I colored it with Prisma pencils and lightly quilted it.


Using a loftier batt, there was more dimension than the others. And I'm noticing a ball of lint in the photo...... I could have made a sweater out of the lint I generated with the other two pieces.

~~~~~~~~~~

And I had a few more photos of the Slice House Round Robins to show you.

This is Jane's house. Her house is an antique and the color matches it perfectly. I love it.

This is Joyce's, her house is an antique too. One of my favorite pieces because of the bright red door and perfect shadowing. Looks so inviting, doesn't it?


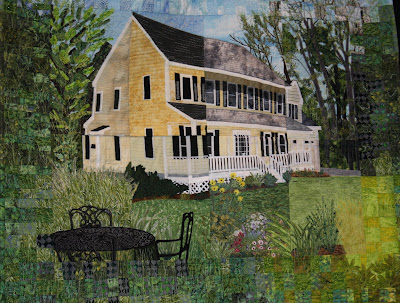
This is Kathleen's. I love the porch and wrought iron table in the bottom left. You may have seen this in Houston, last year. She entered in the group category and won!


Posted by Picasa